
Note: This review is for the US Collector’s Edition of Tomb Raider and NOT the game itself.
As with Warner Interactive’s
previous offering from Netherealm (Mortal Kombat 9), Injustice: Gods Among Us has been given two different non-standard editions.
Likewise, the game, regardless of edition, has been graced with rather excellent
retailer-specific DLC. This review is only going to focus on the Gamestop
exclusive Battle Edition of the game. The need to purchase from Gamestop means
that the pre-order DLC mentioned in this review will be the “Red Son” content
offered by the aforementioned retailer.
Before
I start the review, I would like to note that even though I will always pick a
fight stick edition over a collector’s edition (as I did with MK9), the terrible
design for the Collector’s Edition’s statues probably would have swayed me
towards the Battle Edition regardless of my preference for fight sticks.
This goes for both the UK and US
statues. As far as the UK edition is concerned, I can’t see myself really
wanting a statue of Batman with his fingers wrapped around Wonder Woman’s
throat. I realize that Batman does not have the hand-strength required to
actually choke Wonder Woman, but the image is still one that I find a bit
difficult to want on my shelf. The prospect of having to explain to the
non-comic book inclined why Batman’s choking a girl out is not something that I
would look forward to.
The US edition is a mess for
completely different reasons. The first problem is that the two battle-engaged
characters aren’t even facing each other. That’s a terrible design choice. How
did they expect the statue to effectively convey the tenseness of the battle
when the two combatants aren’t even eye to eye. Sure, Wonder Woman is heavily
engaged in the battle, but Batman seems to just want to escape. The other major
problem with the statue is that a fair amount of the sculpt relies on the use
of a generic sci-fi spacecraft. Considering that Wonder Woman actually owns her
own jet, it would have made more sense to have some fun trying to include an
invisible plane into this sculpt. It’s a missed opportunity and it’s been
replaced with an object that has no obvious reason for being there. With that
said, let’s see what we get with the Battle Edition.
The US Injustice: God Among Us: Battle Edition Includes:
1) Injustice Game
2) Injustice Fight Stick
3) New 52 DLC Skins for Superman, Wonder Woman, and Batman
4) Red Son DLC (only if pre-ordered at Gamestop)
The Packaging:
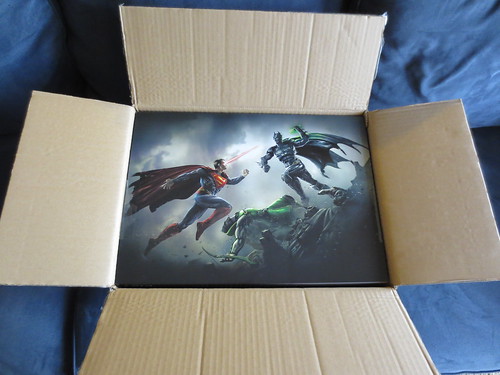
The
Battle Edition’s packaging is nothing special. Unlike the ornate packaging that
we usually get with special editions, the box for Injustice is a clear case of
function over form. There is a slipcover, with an image of Batman and Superman
fighting, that covers a plain black box. Along with the aforementioned
image, the slipcover has a wide version of the game’s standard cover on one side
and a description of the edition and game on the other side. There is nothing
printed on the bottom.

Inside
the box, we find a USB cable, the game (with DLC card inside), and the
fight stick. The fight stick is surrounded by a form-fitting mold made out of an
egg carton type material. Between the mold and the fight stick is a thin sheet
of that Styrofoam paper stuff. It’s nothing fancy, but it protects the stick.


Injustice’s
conservative packaging is none too exciting, but considering what it’s for,
that’s not too bad of a thing. It doesn’t take up more space than it needs to
and it protects the stick.
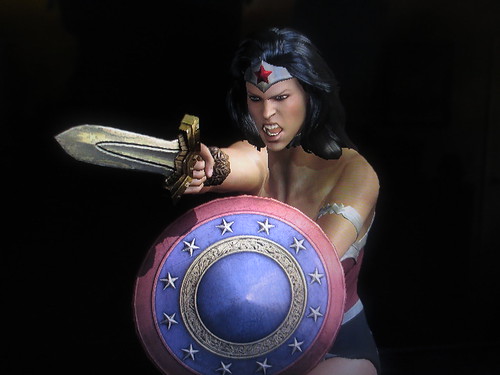
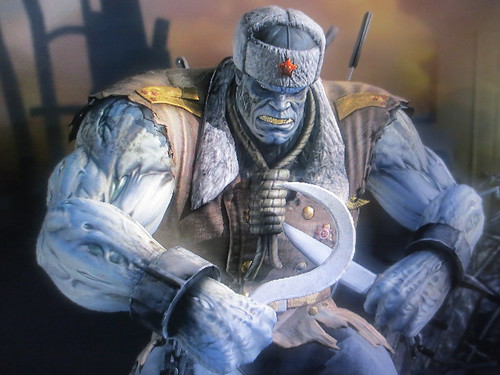
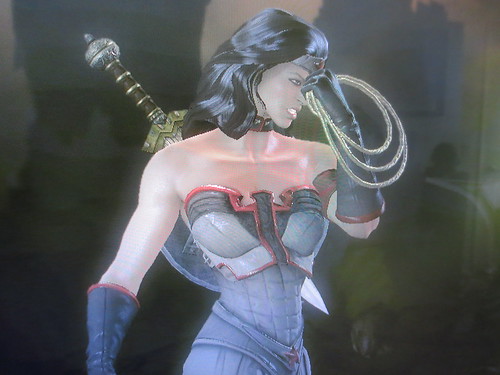
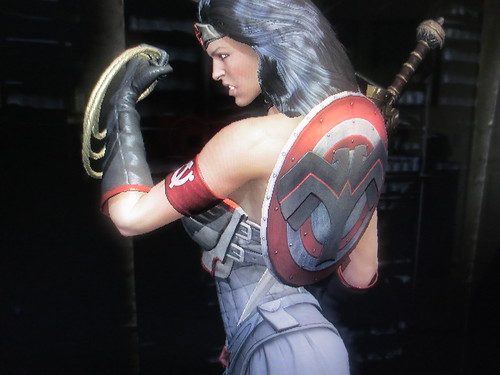
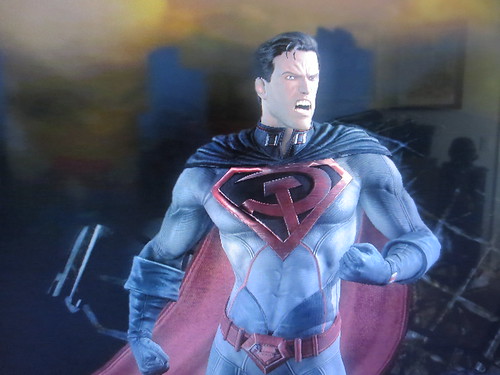
DLC (Photos of Skins at End of Review):
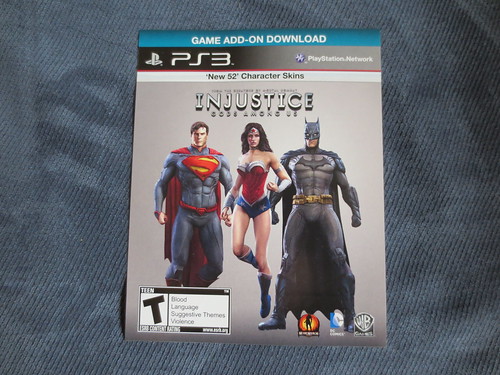
The
New 52 DLC skins are acquired via a download code printed on a card inside the
game’s box. The DLC is less than a Megabyte in size and, therefore, is clearly
a piece of disc locked content. The same is true for the more substantial Red
Son DLC. Like most other DLC inclusions, this is yet another situation where I
feel that the Battle Edition isn’t made better by the DLC so much as the regular
edition is made worse.
For
what it’s worth, the New 52 Skins look nice enough and the Red Son DLC promises
a fairly large amount of content. The Red Son comes with Skins for Wonder
Woman, Superman, and Grundy. They, in keeping with the Red Son story, follow a
communist Russia theme. Along with the skins, the Red Son DLC also includes
about 20 missions for the game’s Star Labs section. These missions vary a good
deal to mix up the fun. For example, the first mission isn’t even a fight.
Instead, it’s a mini-game where you have to input commands to help baby
Superman’s rocket get to earth (Oddly enough, this rocket is the one included
in the US Collector’s Edition’s statue… which makes no sense).
Though
the Red Son DLC is a clear winner, I wouldn’t recommend that people who missed
out on the pre-order bonus try and pick it up through a secondary market like
ebay. Like Mortal Kombat 9, I have no doubt that Injustice’s DLC will make it
to the PSN and Xbox Live in a fairly short amount of time. There’s really no
reason to pay a potentially inflated price for the content when patience is all
that is required.
The Fight Stick:
Before
I review the stick, I’d like to thank the people over at Shoryuken’s Tech TalkForum. They have been a great help over the past few weeks. On top of that,
special thanks to user KaiHong for being the first person to open the stick up
and see what makes it tick.
The
fight stick’s review will be broken up into parts to make it easier to digest.
The Shell:
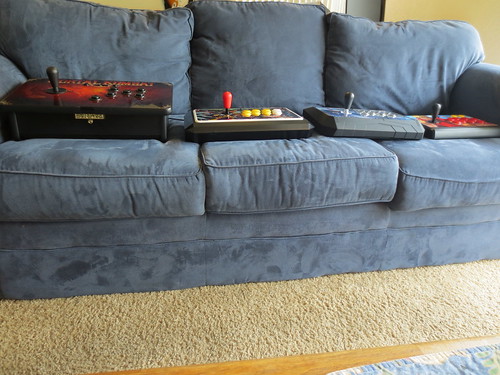
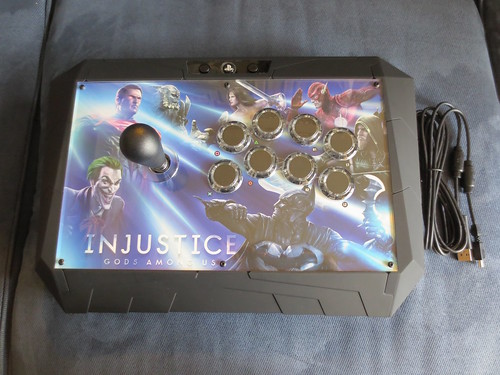
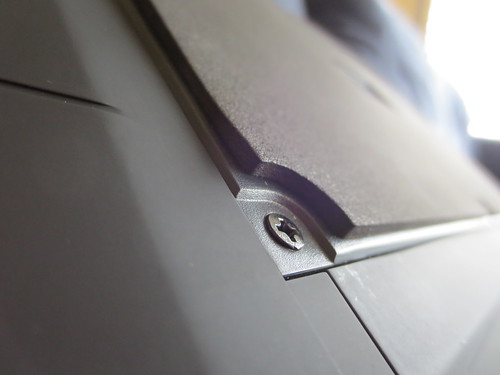
The
Injustice Stick’s shell is incredibly light. It may even be too light. The stick
does not feel terribly substantial. This probably has a lot to do with the fact
that the shell doesn’t contain any metal or wood. The whole thing is plastic.
There isn’t even a metal plate to hold the buttons and joystick into place. I
wouldn’t be surprised if this stick’s weight is a direct response to how
incredibly heavy PDP’s Mortal Kombat sticks were.
Thankfully,
the all-plastic construction doesn’t make the stick feel cheap. Quite the contrary,
the stick feels very well made. The top of the stick has a nice thick piece of
removable plexiglass to protect the artwork. The rest of the stick is almost
entirely covered in a thin soft layer of rubber. It’s very much like what one
finds on Razer’s mice. This helps the stick feel like a premium item. With any
luck, the rubber layer is durable enough to withstand a decent amount of wear
and tear.
The
bottom of the stick has a very thin layer of foam. It is put there to help keep
the stick from moving around on whatever surface it’s resting on. It’s a nice
idea that doesn’t really work. The foam is much too slick to really prevent the
stick from sliding around.

The
shell has a very unique kind of shape to it. It’s very close to being a direct
copy of Madcatz’s TE sticks. The major difference between the two sticks is
that the Injustice stick is covered with a series of futuristic lines. It looks
like something out of Star Tours. It may not appeal to everyone, but, for my
money, it looks wicked sweet.

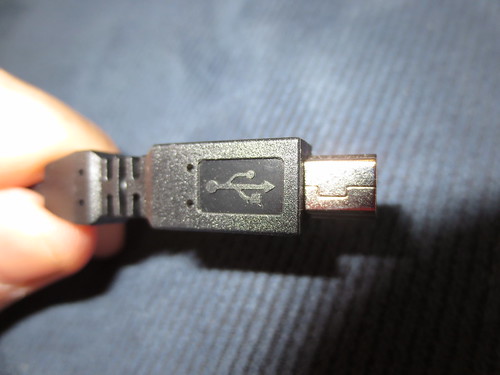
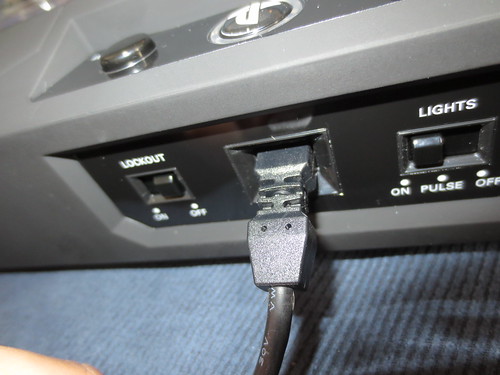
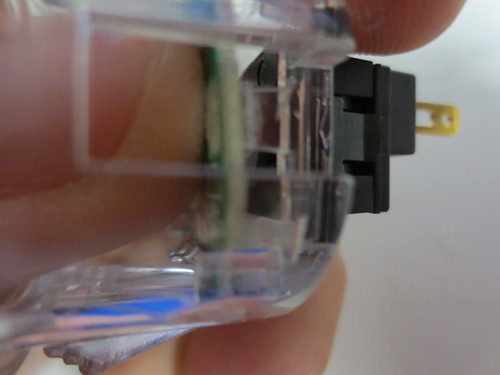
On
the back of the shell are the controls for the stick’s light, a lock-out switch
and the USB jack. The USB jack is very odd. It’s recessed into the shell and is
surrounded by walls that allow for only the thinnest of cables to fit. In fact,
the USB jack is so oddly placed, that the included USB was probably designed
specifically for this stick. It is very thin and has a small joint to allow for
movement. Considering how special the cable is, it’s unfortunate that, like
many other sticks, this one does not come with a cable compartment.

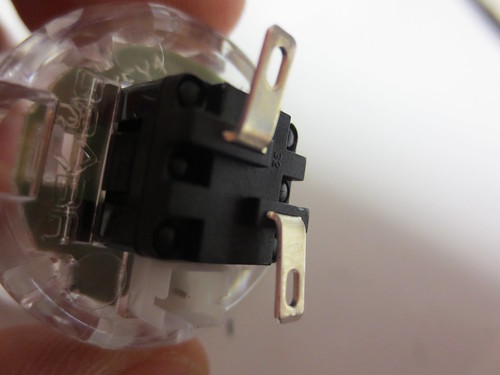
The Electrical:

If
this stick is to have any future claim to fame, it’ll be because of the
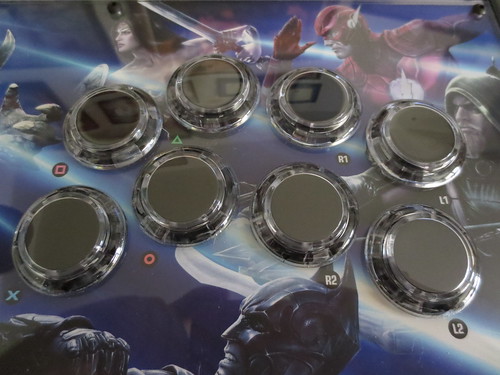
included LED lighting. The stick comes with blue LED lights for the buttons and the stick. The lighting isn’t as exciting as I originally
thought it would be because the buttons have a solid black core inside of the
clear plunger. This makes it so only the borders of the buttons light up. The
stick is much the same. Because the stick has a solid shaft and top, only the
clear shaft cover and dust washer light up. It may sound like I’m down on the
lighting, but I’m not. The lighting is actually very cool and effective. It’s
just very different from what I was expecting.


The
lights have 3 available settings. The first is, “off.” It’s useful for when you
want to not use the awesome LED lights. I don’t know why one would want to do
that, but the option’s there if you want it. The next setting is, “on.” It
makes it so that the lights are permanently on. This is the setting that most
people will end up using. The last setting is, “pulse.” When pulse is
activated, the LED’s turn on whenever the stick receives a signal to rumble.
It’s a fairly cool effect, but the title of the setting is kind of a misnomer
as the lights flicker more than they pulse. As cool as the effect is, there are
a few downsides to the pulse setting. The first is that pulse will only work on
games that come with a rumble option. The second is that most fighting games
only rumble when you’ve been hit and not when you are doing the hitting. So,
the LED’s end up acting like damage indicators; as if an enemy vessel
has just shot your starship and your shields are taking damage. On second
thought, that’s much cooler than having the LED’s light up when you hit your
opponent.
The
stick also comes with a lockout feature. When it’s active, there is a red
indicator light on the stick to warn you of its use. This is nice because when
you find that the start and select and home buttons no longer work, you won’t
have to try too hard to figure out why. The lockout switch locks out only those
buttons. Every other button will continue to function.
The
last thing I’d like to mention about the electrical components is that the
joystick is only mapped to what would be the Playstation pad’s digital d-pad.
This makes sense, but it does cause problems with titles that only function
when an analog stick is present. For example, Double Dragon Neon wouldn’t even
recognize the joystick or the buttons. Because most fighting games (if not all)
will not lock out support due to a missing analog stick, this small
inconvenience shouldn’t pose much of a problem for the fighting game
enthusiast.
The Joystick and Buttons:
Might
as well get this out of the way, this stick does NOT use authentic arcade
parts. The joystick and the buttons are Sanwa clones made by Qanba. It’s
strange that PDP didn’t just make the parts themselves. Most of the time,
companies only outsource the parts when they want to include authentic arcade
ones. This is what PDP did with the Mortal Kombat stick when they used Happs.
More likely than not, outsourcing the parts was done to keep costs down, but
it’s still very odd that PDP outsourced to get clones.


Given
that the parts are clones, one should not expect the same kind of quality found
in a Madcatz TE or comparable stick. To start with, the joystick is terrible.
There is a too large deadzone and you can feel the fight stick’s pivot rubbing
against the stick’s casing when you move it. It feels cheap. On the plus side,
the stick is accurate. I had no trouble pulling off my moves on Super Street
Fighter IV AE. If you can get past the feeling of plastic rubbing against
plastic (or if you never notice it), then you may very well like the Qanba
Sanwa clone.

The
buttons fair much better than the stick. The buttons do not feel like Sanwas.
Thankfully, though, they’re still pretty good. Compared to the Sanwas, the
buttons are a bit clunky. Compared to something like stock Hori buttons,
however, the Qanbas are miles ahead. The buttons have a certain snappiness to
them that makes them satisfying to use so long as they are not being compared
to the much better Sanwa buttons. Like Sanwa buttons, the switches inside the
buttons do not click when they engage. Instead, they engage softly. On the
whole, the buttons were are surprisingly good considering what they are.
The Artwork:
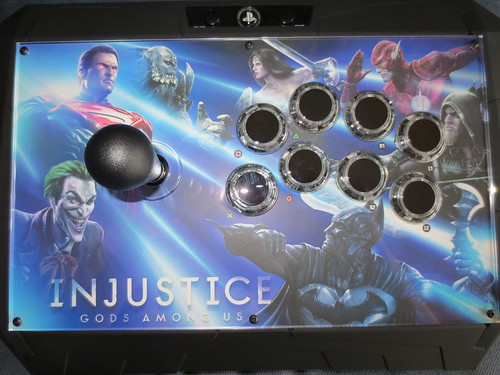
The
artwork for the stick is pretty bad. It’s also a good fit for the game’s art
direction. Thankfully, it will be very easy to replace. Speaking of
replacements, the next section will be about modifying the Injustice
Fight Stick. If you are not the kind of person who cares for such information,
feel free to skip it.
The Inevitable Modifications (you may not understand some of
these terms and that’s okay):
Shoryuken
member Kaihong (previously was mentioned) suggested using the following
modifications. He suggested replacing much of the joystick with the parts from
a Sanwa JLF. He said the most important thing was to switch out the Qanba’s
terrible pivot. That was the reason for most of the plastic on plastic rubbing
sensations. Everything else was not really necessary to switch, but still a good
idea. For anyone curious, the only reason that a full JLF drop in isn’t
possible is that the Sanwa body doesn’t have enough space to accommodate the
PCB for the joystick’s LED’s.
He
also suggested switching out the Qanba buttons’ switches for Sanwa switches. I
have already done this with two of the buttons and can safely say that the
results are positive. The modded buttons don’t magically feel as good as
Sanwas, but they are a definite improvement. If it weren’t for the extremely
difficult process involved with swapping the switches, I would recommend that
everyone do it.
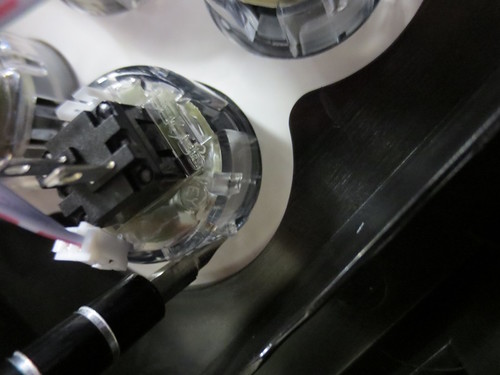
Due
to the way that the buttons hold the LED PCB’s, it is very difficult to remove
the PCB without damaging it. This is a huge problem because the switch we want
to trade out is held underneath the difficult to remove PCB.
If
you are brave and have done this kind of thing before, here are the steps I
used. Keep in mind, I am NOT saying that this method will work for you and I make no guarantees Any
damage you cause to your buttons is YOUR OWN FAULT! USE EXTREME CAUTION when
working with fragile PCB’s. These LED boards will be very very difficult to
replace, as they are specialty parts that are not currently available outside of this stick.
YOU HAVE BEEN WARNED.
Step 1:
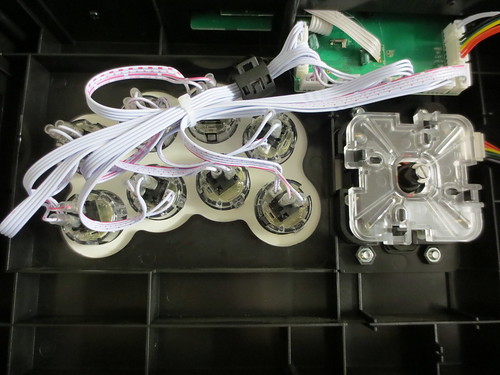
Open up the bottom of the stick. There is no reason to do
this through the top of the stick. The bottom offers more secure access.
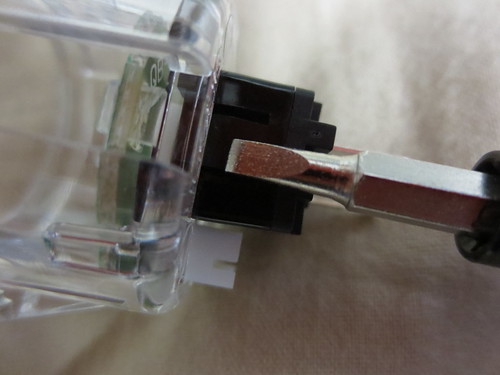
Step 2:
Pull off the quick disconnects connecting the button to the
board. Also pull of the cable connecting the LED to the board. The LED cable
may need some gentle wiggling. DON’T force it. I decided to do the buttons one
at a time so I wouldn’t have to remember which cable went where.
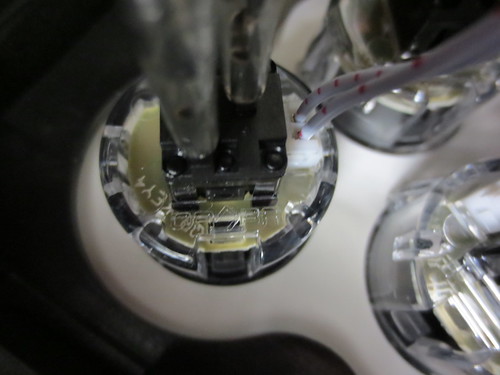
Step 3:
Using a flathead screwdriver, depress the clips holding the
button in place. You may have to do this for both sides. Pop the button out.
Step 4:
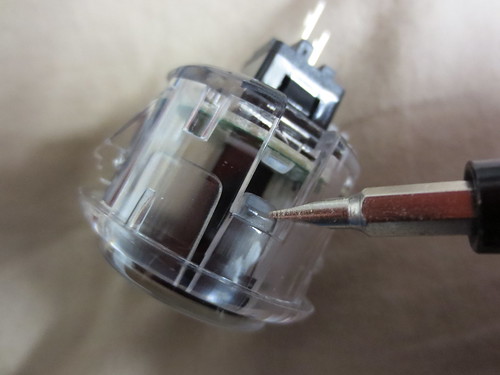
Using a flathead screwdriver, push the tabs in to remove the
plunger from the housing.
Step 5:
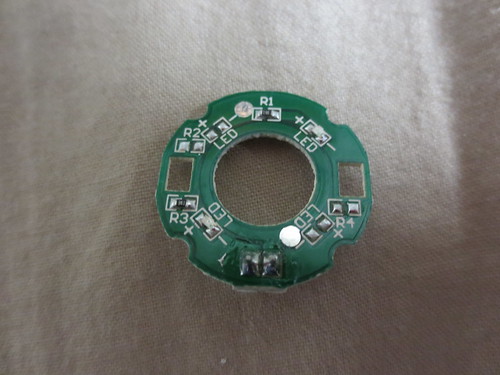
Here’s where it gets tricky. If you look closely, the PCB
has current going through the tiny edges on the side of the plastic clips. This
means that that thin piece of PCB CAN NOT BREAK! The tough part is going to be
pressing in the plastic clips while lifting the board. In order to do this, I
first started by using a flathead screwdriver to help carefully push the
microswitch upwards into the housing. The aim is to have the switch resting
directly under the PCB. By doing this, you’ll later be able to push the switch
up to lift the PCB out when you depress the clips. This will be much easier
than pulling the PCB out.
If you want, you can even bend the contacts out so that you
can rest the button on a table when you do this.
As with all else, be extremely careful. Don’t force
anything.
Step 6:

This is the toughest part. While pushing the switch up (or
pressing the button down against your flat surface), use your flathead to push
the tab on one side in. Do this carefully. If your hand slips, you could damage
the board. If your hand has to slip, slip up and away. Not, down onto the
board. Don’t rush this process. Alternate between both sides until the PCB
is free.
Step 7:
With the PCB out, take out the old switch and replace it
with the new one. It’s a simple drop in procedure.
Step 8:
Another tough part. Put the PCB back into the housing. Take
notice of the plug for the LED as it needs to line up with the hole for it. To
push it in, use your thumb to GENTLY push the PCB into place while using your
flathead to GENTLY press in the plastic tabs FROM THE BOTTOM of the tab. This
will eventually click into place.
Step 9:
Gently place the button back in and try not to tear the
artwork (it’s okay, the factory wasn’t even able to do this well). Reconnect
the wires.
Step 10:
Repeat 7 more times. And that’s it for the button mod. If
you want more info on how to mod the joystick, feel free to check out the tech talkforum at Shoryuken. I won’t describe the joystick mod here because it’s a fairly easy mod to
do and offers almost zero possibility of ruining your fight stick.
Overall:
So,
now that we’re at the end of the review, how does the Injustice: Gods Among Us: Battle
Edition rate? Well, it’s okay. The Edition is really just a way to deliver a new
stick to the masses and the stick happens to be, well, okay. The build quality is in between
the Madcatz TE’s and the Madcatz SE’s. The joystick is in desperate need of
replacing. The buttons are surprisingly snappy and satisfying. The LED’s are
bright enough to be appealing but not so bright that they make you look like a
jerk. Everything mixes together to offer only a slightly above
average experience.
Which
brings us to the pricing. Is a clone stick worth 90 dollars (that’s the
markup)? In order to bring the stick up to more competitive expectations, the
modifications would cost at least 40 dollars (after shipping and tax). With the
added cost, one could easily just go and buy a discounted Madcatz TE. So,
knowing how superior the Madcatz stick is, what is the benefit to getting the Injustice
stick instead? Well, it lights up. And it’s a decent stick.
For
a beginner who hasn’t used other sticks, the fact that this one pales in
comparison to one with Sanwa parts doesn’t much matter. This stick will be good
enough for a newcomer. For someone who can readily tell that this fight stick is not great,
this stick will be fun to use once to joystick has been switched out.
Y’see, even though this stick is
not really great for anyone, it’s also not really terrible for anyone
either. That's because the stick is simply not terrible. The lights really are a very unique
addition to this stick. Currently, the Injustice stick is the only available stick that comes with stock lights. Right now, the only other way to get a lighted arcade stick would be to modify another stick or start a new one from scratch. That light mod or new
build would be much harder to do than the fairly simple (but frustrating) mods
needed to get this stick up to code.
So,
is this stick worth the 90 dollars? Maybe I’m just in a good mood or excited
about playing some fighting games with a tricked out lighted up joystick, but
I’m going to go ahead and say that, yes, the Injustice Battle Edition is worth
the 90 dollar markup. . . But just barely.
DLC skins...
New 52 Batman
New 52 Wonder Woman
New 52 Superman

Red Son Grundy
Red Son Wonder Woman
Red Son Superman
1 comment:
Metal Core PCB also known as MCPCB that is mark out as by having a metal (Aluminium, copper or Iron). It is used in circuit when thermal conductivity or shielding effect is needed.
Post a Comment